
EXP
The max level this time around is 99. You can rebuild Taboo Drops to max capacity to hit that cap.
Quality
Higher quality = better item. This is an obvious relationship, but to clarify: for usables this can be something like a roughly 3x increase in damage at the max quality of 999 compared to something at 70 quality. Your stats will also go up on equipment; the equipment section will explain that a bit more. Quality does not affect gathering tools.
Recipes
New item recipes can be acquired in four ways:
- Through the story
- Through quests (especially early ones, but the final series has a recipe too)
- Recipe morphs (the primary method)
- Buy at Fressher’s Store / Gold Coin Shop
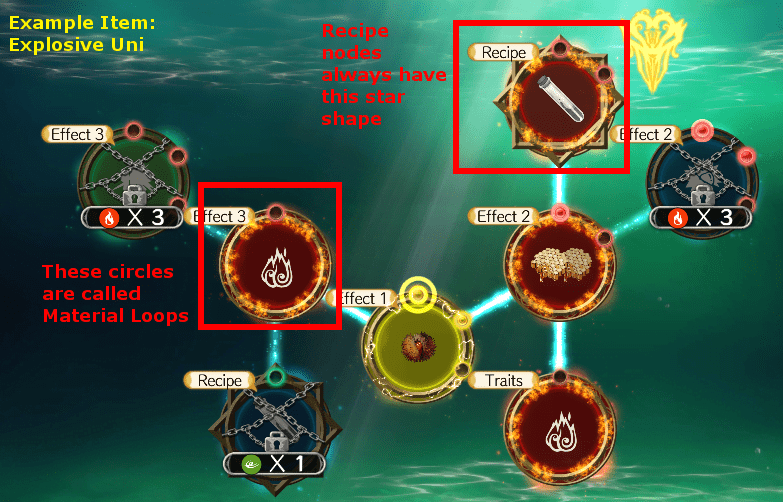
The first two are fairly straightforward methods. The third involves making an item and following the material loops all the way to a recipe node. If you meet the required elemental value at the recipe node, you get a new item.
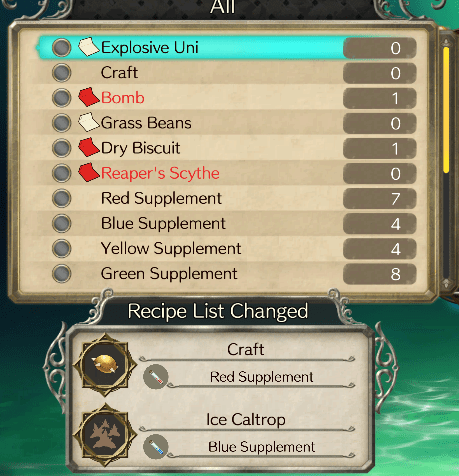
Finally, at the bottom they will simply list what item you can create and which material is necessary.
The Importance of Rank
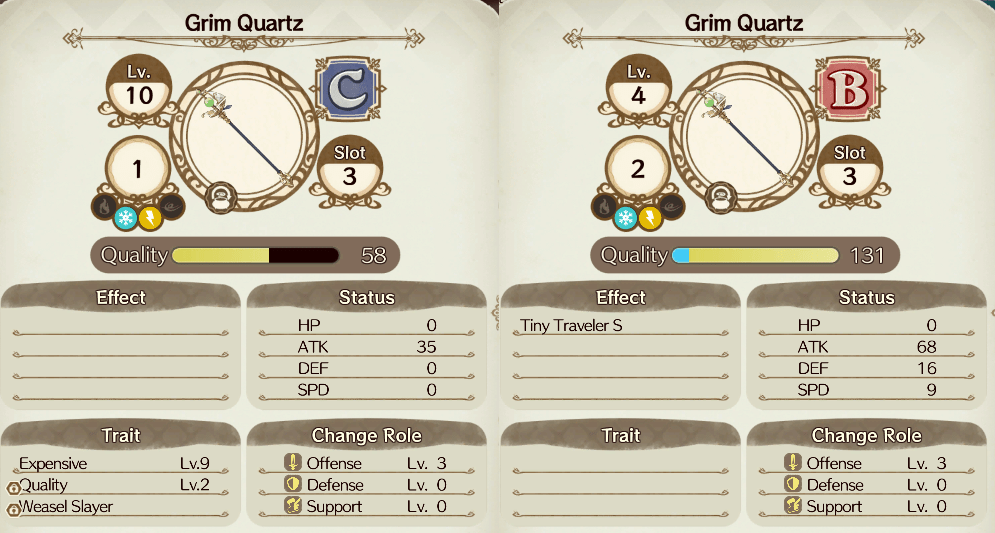
Items have six ranks/grades, E, D, C, B, A, and S. These determine their elemental value. D and C have the default value, while the rest have +1 per rank. This is important for synthesis, as it may help you fulfill requirements for effects. E has -1, but it only appears at the very beginning.
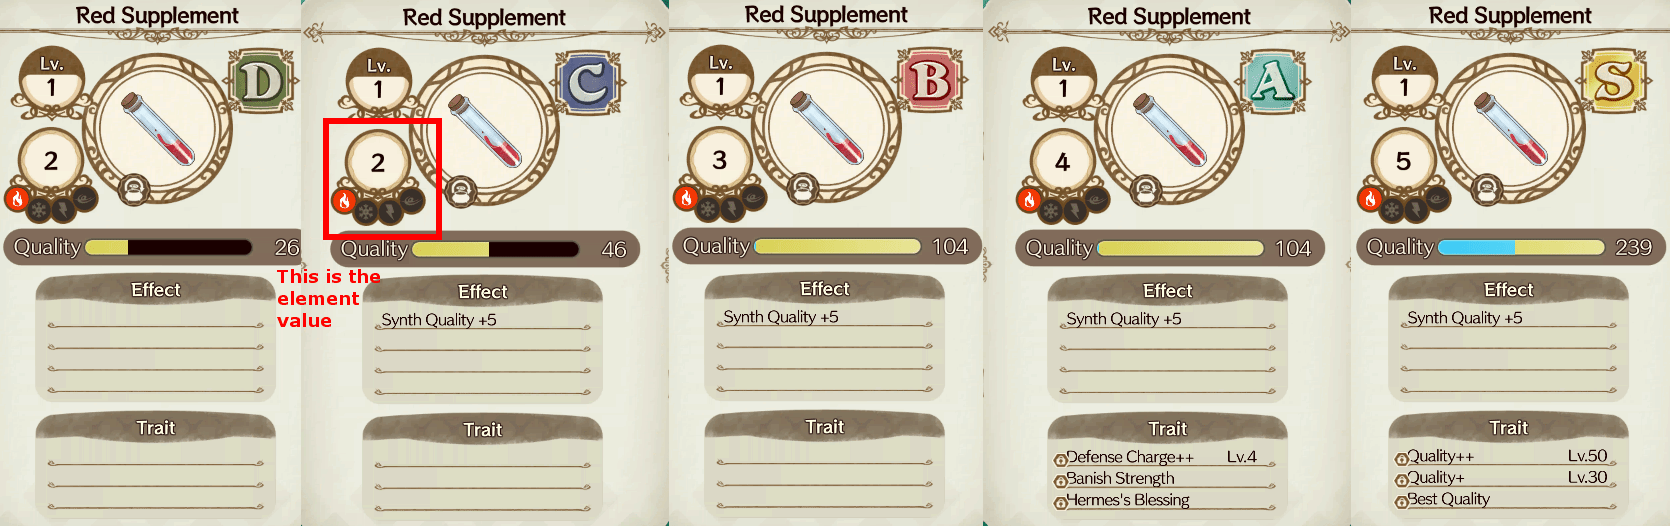
Do note, rank is a combination of quality and item traits. B and A demonstrate this concept; the quality is the same for both, but one has traits.
Synthesis
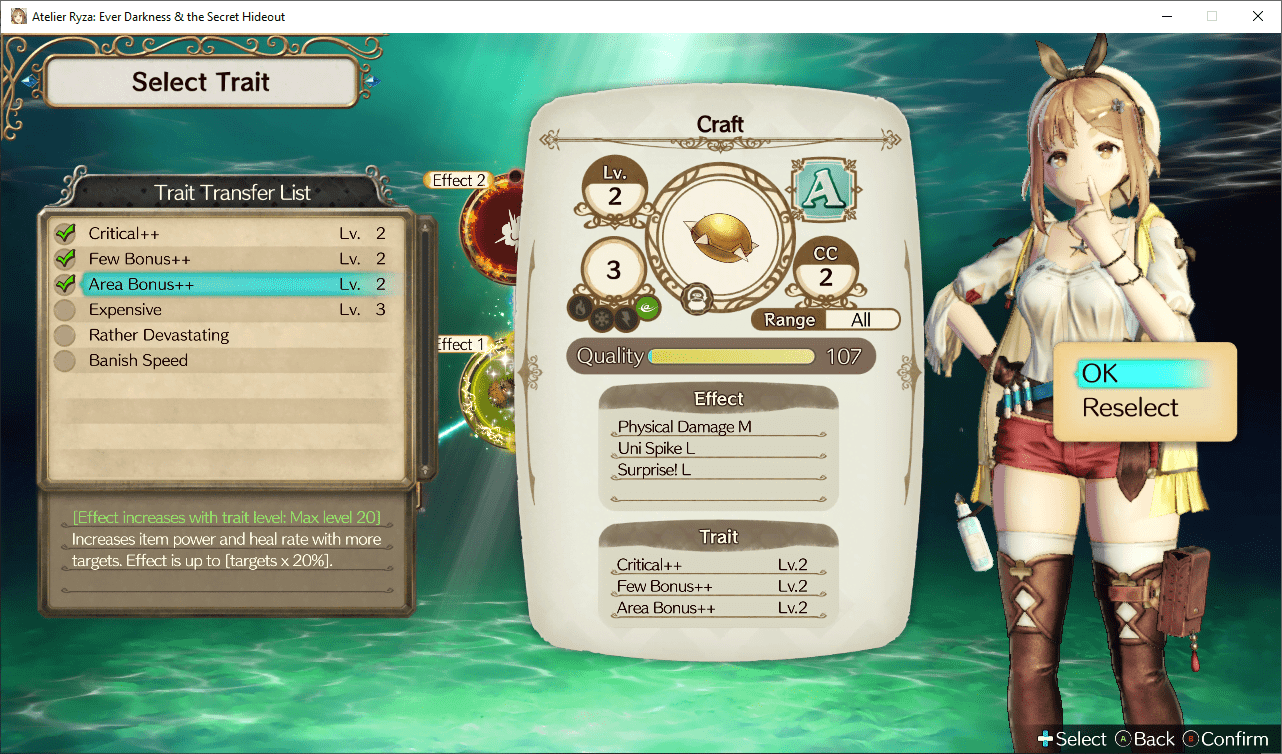
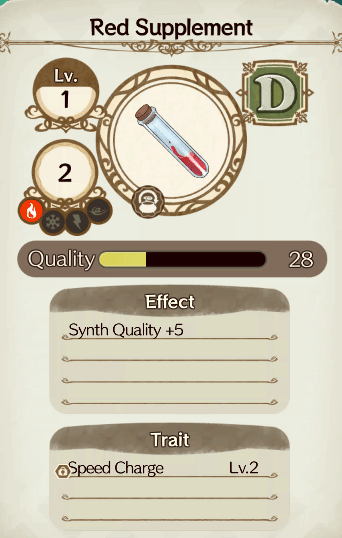
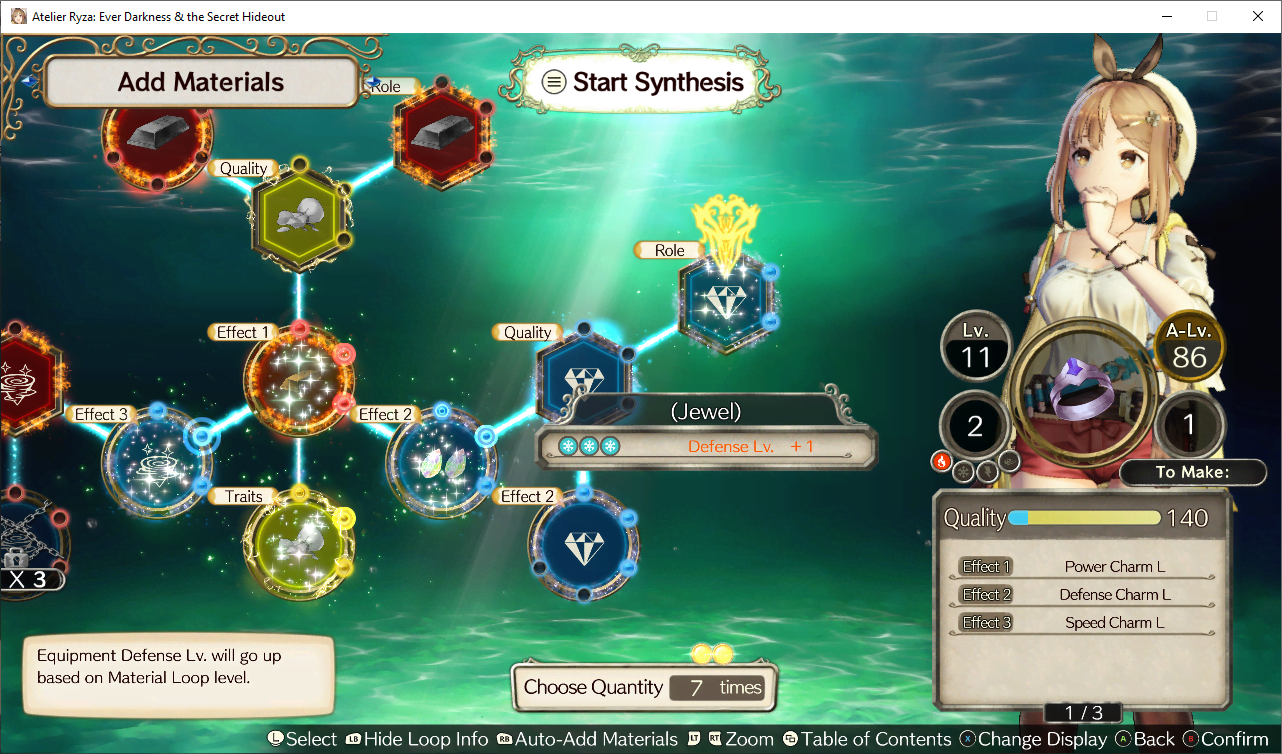
Item used is Red Supplement.
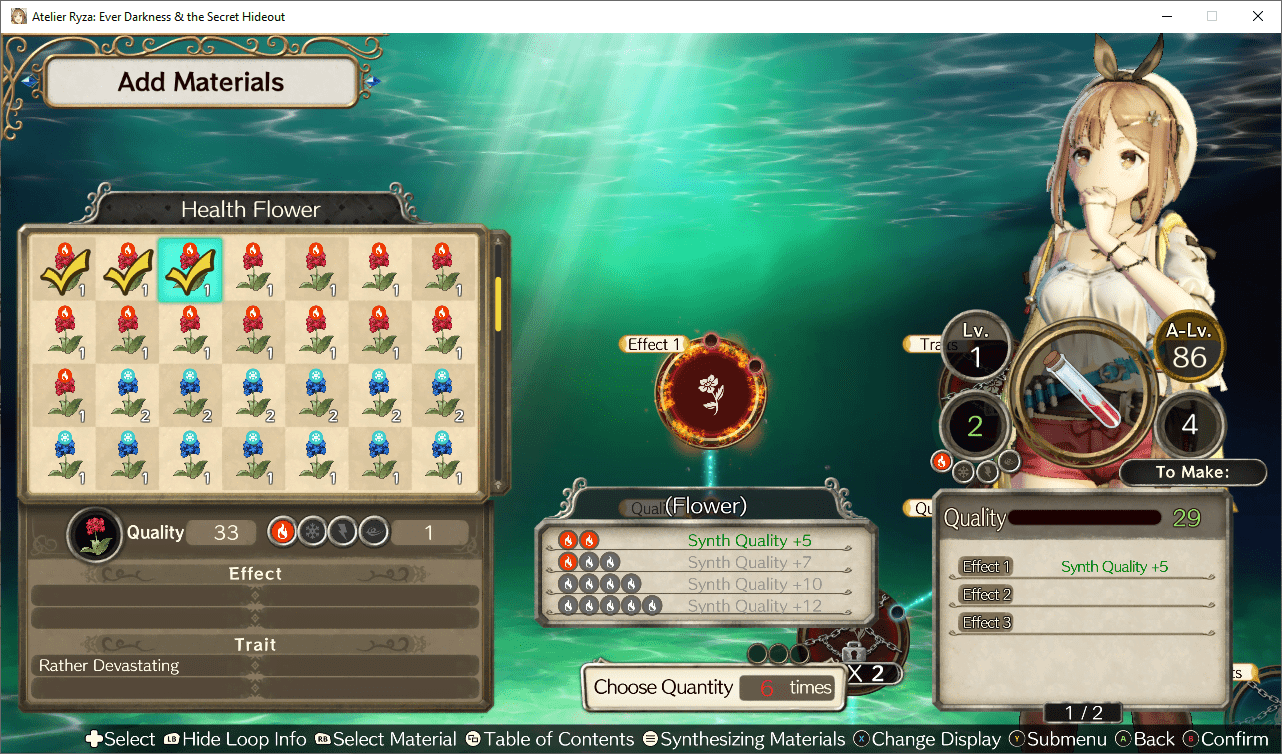
Three Health Flowers have been chosen at once; you can do this with your R1 equivalent. Each of these has a Fire value of one, totalling three. The effect box in the middle highlights three Fire icons to reflect this. This means I have unlocked a single effect: Synth Quality +5. This effect applies when this Supplement is used in OTHER items, rather than to this item directly (in this case, it is simply called Quality +X instead).
At the bottom, you’ll note Choose Quantity. This is how many items you can use before you are forced to complete the synth. This amount goes up as you level up; do note the picture was done at level 86.
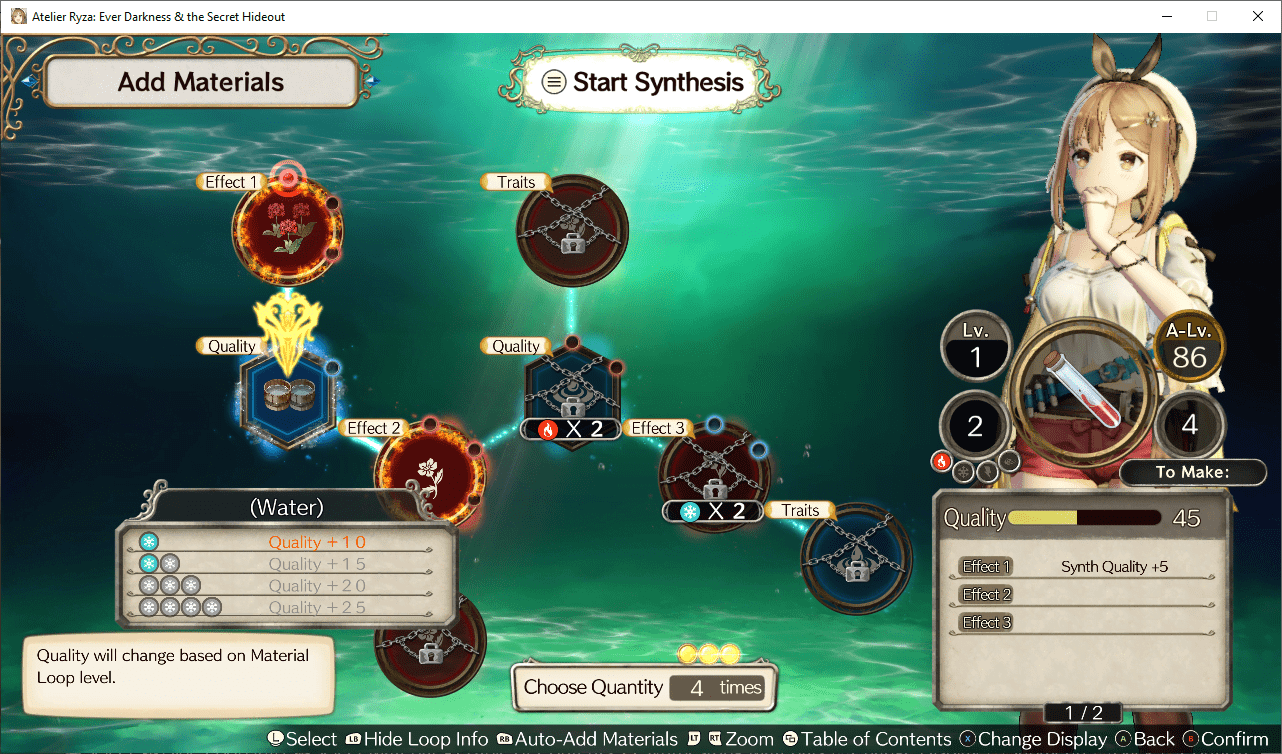
Now note that the three yellow dots at the bottom are filled; this means that this item has met the minimum requirement of three items, and can thus be synthed now (without cramming more materials in). You are not mandated to choose materials outside the initial material loop if you don’t want to; you can complete this item with a few flowers and zero water.
Each of the material loops has a label. Loops labeled with effect will always appear in the effect list at the bottom right upon activation. On other items, there may be multiple nodes labeled as effect 1; this means you can overwrite what you have in effect 1’s slot for something better. Quality will apply to the item immediately. Traits will unlock trait slots, so traits take effect on the item.
Materials loops will have the following labels:
- Effect 1 / 2 / 3 4 (may apply when using as synth item, may only apply during use in battle, depends on effect)
- Role (Applies to equipment, more on this later; Hexagon shape)
- Quality (Hexagon shape)
- Traits
- Recipe (Star shape)
- CC (Usable items only, reduces CC of item, thus allowing you to spam more; Diamond shape)
- Level (Primarily usable items; lowers level of item so more characters can equip, lower gem cost, and allow more item rebuilding; Diamond / Hexagon)
- ATK / DEF / SPD / HP (Accessories; Hexagon)
As far as the shapes go, sometimes ingredients will appear as a diamond over their standard shape. There will be more on this later (yes the shapes are notable!), but it only matters once you get synthesis items with “spread” effects.
If you do not unlock any trait slots, little locks will appear next to the traits. What this means is that the traits will not be active, but can be transferred to other items. These inactive traits also still affect rank; it is possible to use them to increase it. Traits are important to activate on equipment and usable items. On synthesis items such as red supplement, only quality related traits are useful to activate, and this mostly applies late in the game.
Synthesis With Recipe Morphs
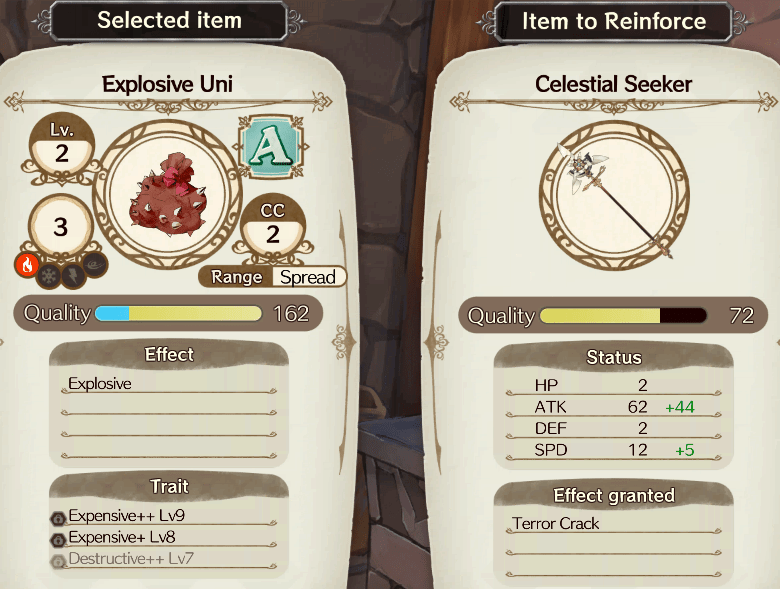
Why might it be useful to synth an item starting from the item before it? Let’s take an earlier practical example, the Craft. It springs from an Explosive Uni.
The Craft’s Effects are as follows:
- Effect 1: Physical Damage
- Effect 2: Fading Strength (ATK debuff)
- Effect 3: Exploding Spikes (extra damage)
Explosive Uni has the following
- Effect 1: Explosive (physical damage)
- Effect 2: Uni Spike (stun gauge damage)
- Effect 3: Surprise! (turn delay)
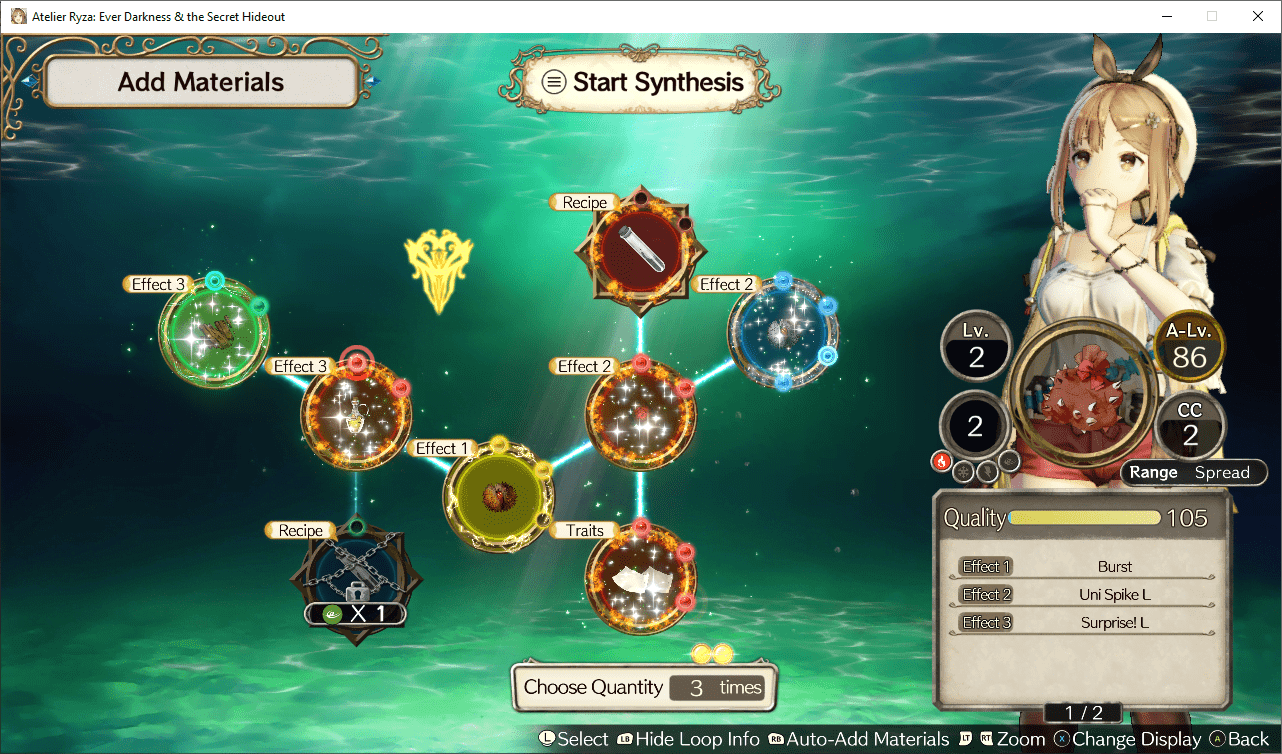
To be entirely frank, stun and turn delay are broken af, so it’s nice to transfer Uni Spike and Surprise to a Craft, certainly much nicer than the extra damage and debuff Craft has natively. The second thing that makes Craft notable is its low level, so most characters should equip it, even after a mild amount of rebuilding.
To transfer, you start out with the Explosive Uni. Be sure to get as high on Effects 2 / 3 as possible, but Effect 1 can be garbage. It is, secondly, critical that you get all your necessary trait slots here. One is good enough to start out with; you will struggle to get your dream item earlier on.
By only applying ingredients in the left material loops, we can avoid overriding Effects 2 and 3 with Craft’s native effects, thus keeping the effects from Explosive Uni. Effect 1 has a default effect, so it’s impossible to keep Explosive Uni’s (not that you would want to; it’s weaker).
As can be seen, Effect 3 is blocking the way to the traits loop on a Craft. By unlocking traits on the Explosive Uni, we can still activate traits.
Crafts are normally Lv. 4 items. Note that the Lv. 2 from Explosive Uni carried over. Having a lower level makes it easy for characters like Lent to equip items that are normally above their dexterity.
Granted, your first shot at a craft like this won’t be so nice. But you can still get fun results from early on, and use rebuild to try adding a bit more to your item.
It is extremely important to note that you can transfer CC -1 between items as well. This is probably easier to plan around than keeping random effects from lower tier items; quite often you won’t (or even can’t) do that.
A final important note: you gain quantity when you go from one item to the next, such as Explosive Uni to Craft. You’ll see the number by Choose Quantity go up. You can build this number fairly high on equipment. The amount depends on level, but it goes to +8 per new recipe.
To recap, these are the reasons to recipe morph:
- Transfer a lower level to a higher level item (important for equipping usables and for reducing gems spent in duplication)
- Transfer things from lower level items to higher level ones (such as CC -1, roles, quality, and traits). Not everything is transferable.
- Add more items than you’d normally be able to (generally useful, but highly important for equipment -- ingot and cloth effects stack), as you get up to +8 quantity per item (depends on your alchemy level)
Item Rebuild
At some point in the game, you’ll unlock Item Rebuild. It exists to make synthesis easier, actually. Note that you cannot rebuild an item to a higher level than your current alchemy level.
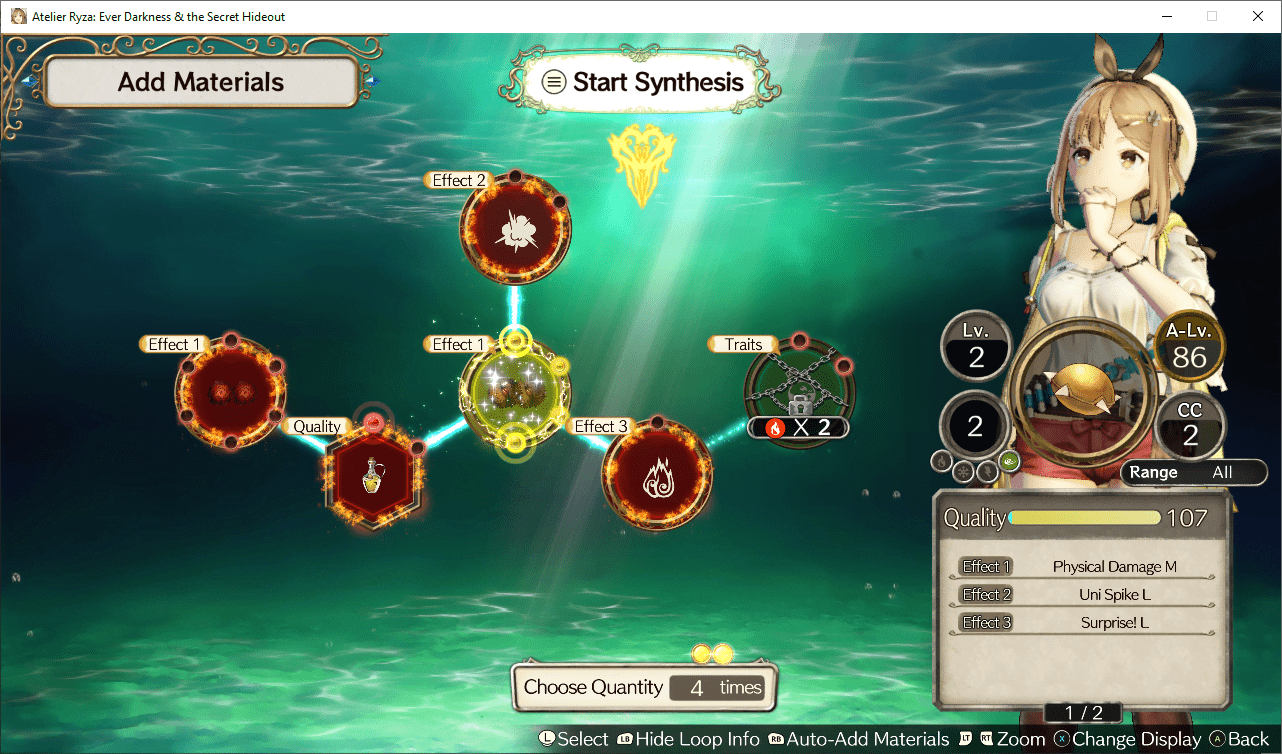
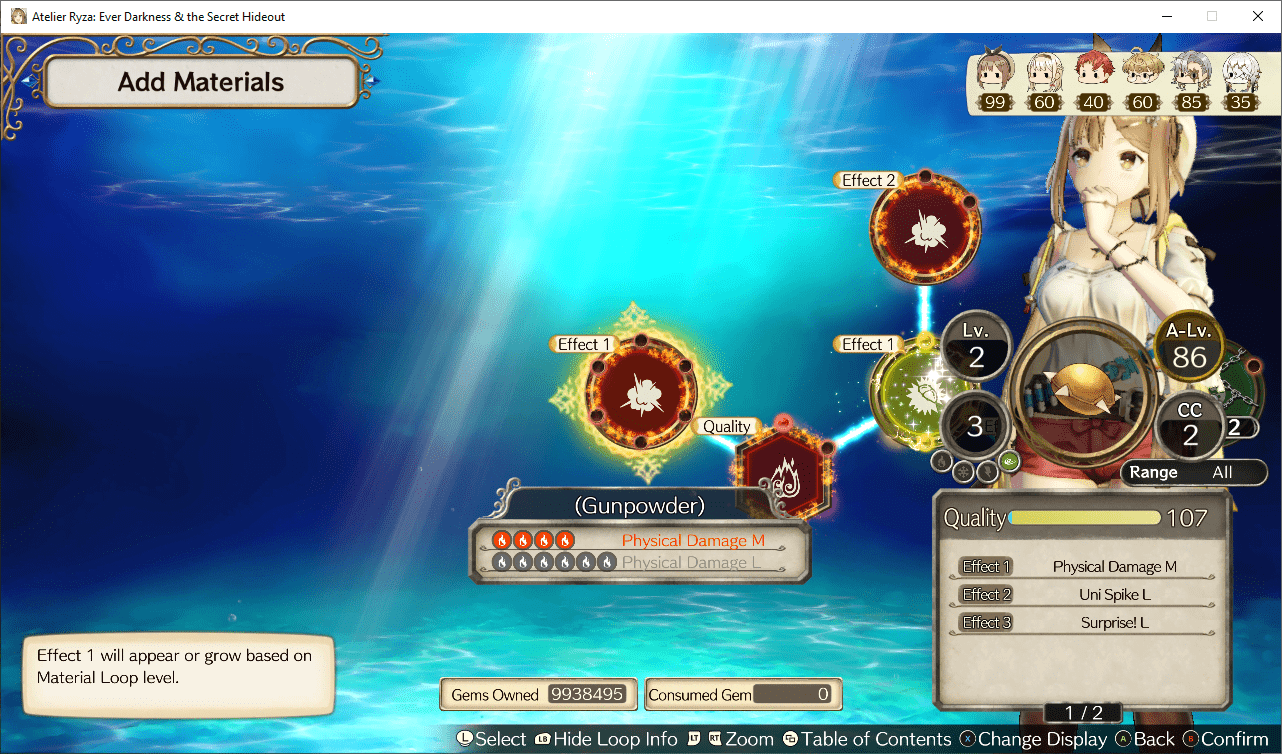
To take the Craft as an example, it has Physical Damage M over its L version. This isn’t great, so let’s fix it. Going in, the level of the Craft is 2, which is important to note.
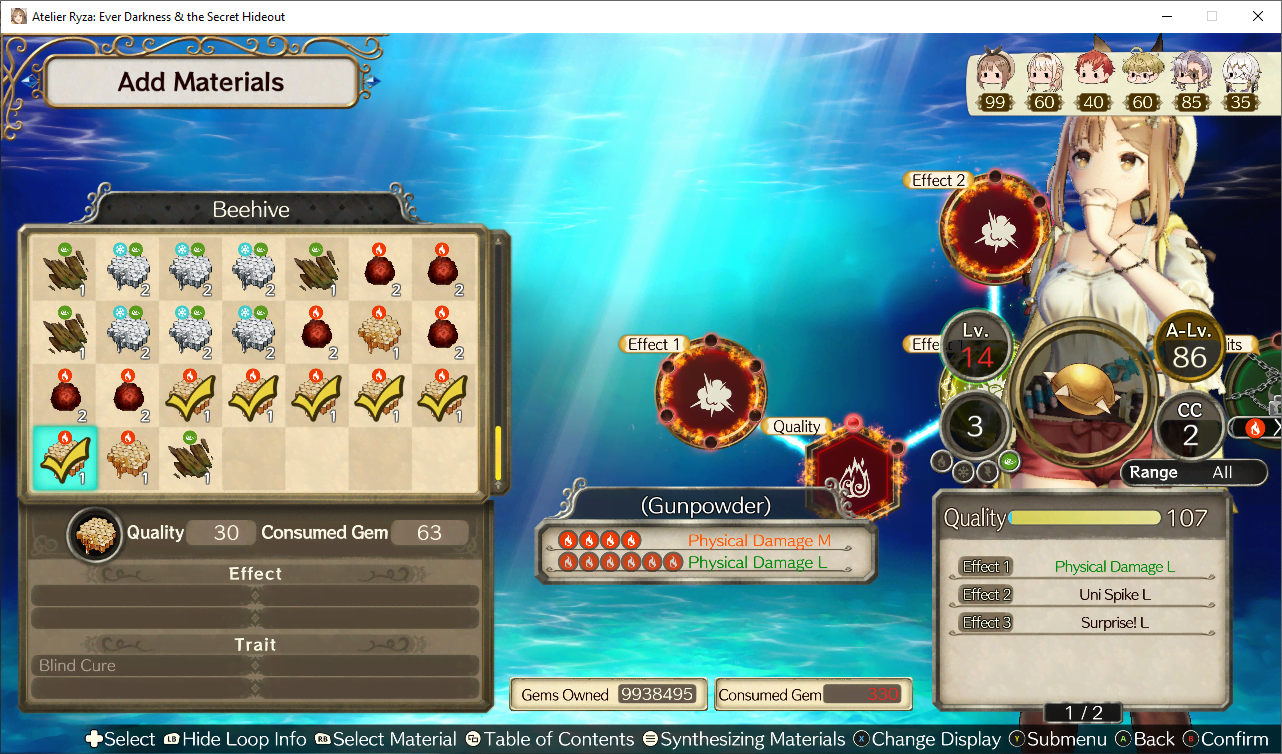
Now let’s try and add six beehives to get the Craft up to speed, shall we?
The level of the item is now 14, at 2 levels per item. If you look in the top right, you’ll see numbers beneath the characters. These are the max levels they can equip. Characters like Lent will have a lot of trouble equipping rebuilt items.
But honestly, six beehives with a value of one aren’t that good. Let’s try three Crimson Ores with a value of two instead.
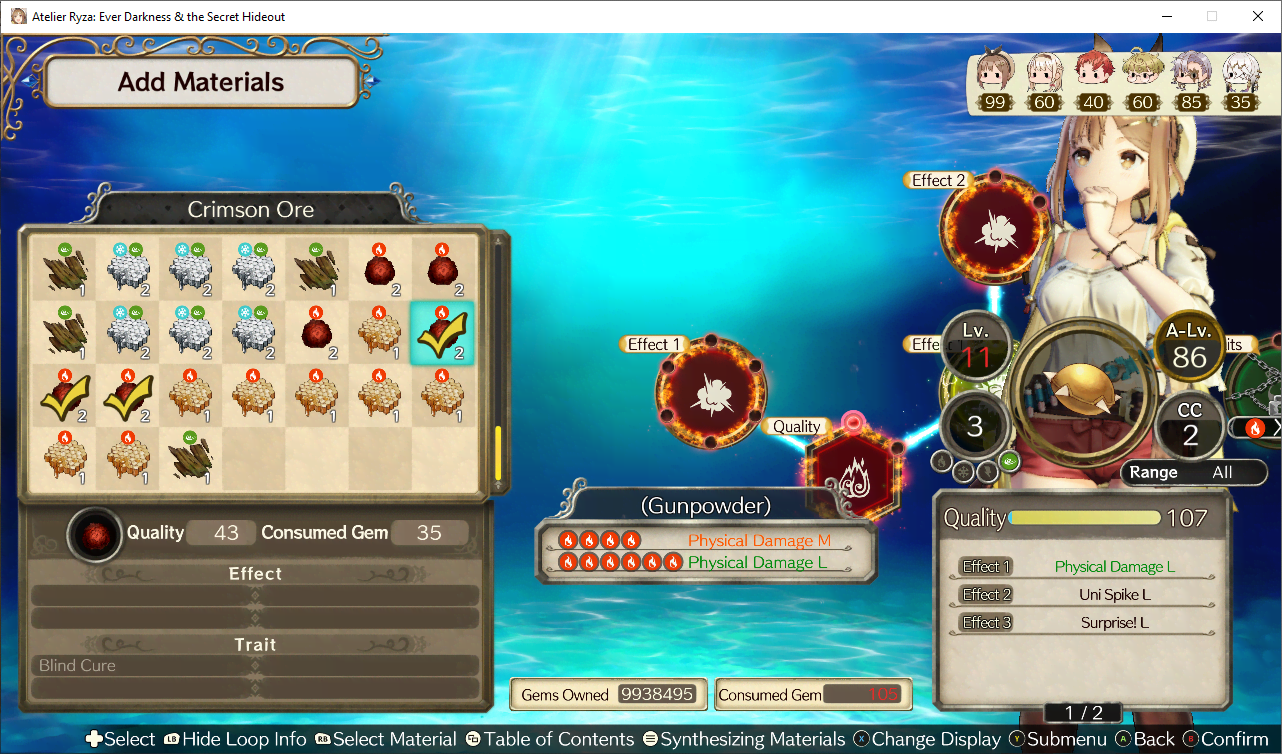
Now the Craft is level 11, which is 3 levels per item instead of two. The levels added are the element value + 1, so use better materials when possible.
Rebuilding items will consume gems, and the gems consumed depends on the materials you throw in.
Finally, rebuilding allows you to put new traits on the item, or just keep the old ones. Note that the quality remained unchanged, regardless of quality of ingredients. Rebuilding is a purely positive effect, outside of raising item level.
Gems
To state it plainly in its own section, Gem cost is determined by rank, effects, and level. Rank is, again, a combo of quality and traits. Use recipe morphing and level reducing effects to lower the level of items.
Leveling Traits
Let’s take a couple traits you’re likely to find or use early in the game. You’re trying to make a bomb and you’re weighing whether to use a Destructive trait or a Devastating trait. We’ll take the first tier from both as an example:
- Destructive Lv. 2 — [Effect increases with trait level: Max level 15] --- Increases item effects by up to 15%.
- Rather Devastating — Increases item effects by 10%.
Early in the game, you might as well not bother leveling traits for a 5% higher boost. But later, when you get the really good stuff, you will want to level traits. I'll explain why:
Rather Devastating gives you a set amount of item effect, no strings attached. It’s very easy to use as a result.
Destructive Lv. 2, on the other hand, can be raised to 15%, but at Lv. 2 it’s only at 2%.
Of course, you’ll note that traits you can level end up BETTER once you max out their level. Later in the game, you’ll absolutely want to do this, and here’s how.
We’ll use an extremely basic Speed Charge Lv.2 as the example. It has a max level of 15. Ordinarily you would try to get Add (Gunpowder) and Add (Fuel) on this Supplement so you can have more items to spread it to, but we’ll just take a Cloth as an example next step.
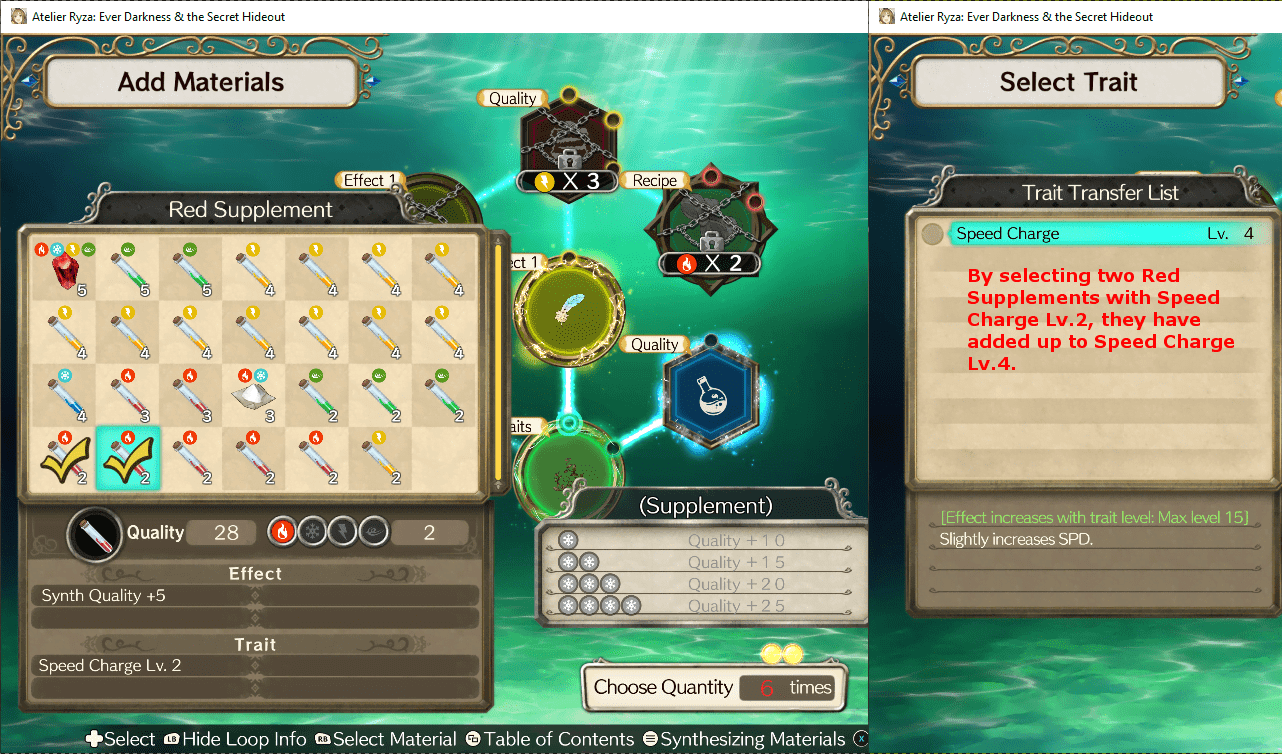
As can be seen, the two Lv. 2 traits add up to Lv. 4. All you have to do is continue adding until you hit the max level, again 15 in this case. This may take multiple synthesis steps / items. But there is a catch — trait level may not exceed your alchemy level.
To be extra clear, if you threw in three of these supplements, the level would then be six, with four it would be eight, and so on. It stacks per item.
Spread Materials
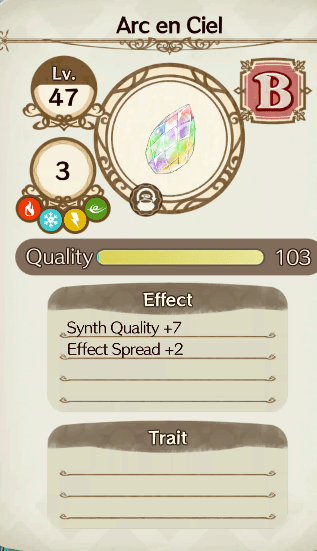
This is not an early game concept, but it can stretch out your materials to the limit without using item rebuild. You’ll be looking for materials that have the effect called Effect Spread +1/+2/+3. We’ll take Arc en Ciel as an example, though the Compass comes way earlier. Arc en Ciel by default has all elements at a value of 2, so you can see why this is powerful already.

Now to toss it in a Gnardi Ring….
Before applying the Arc en Ciel, it looks like this. The only item added is the central Bronze Eisen.
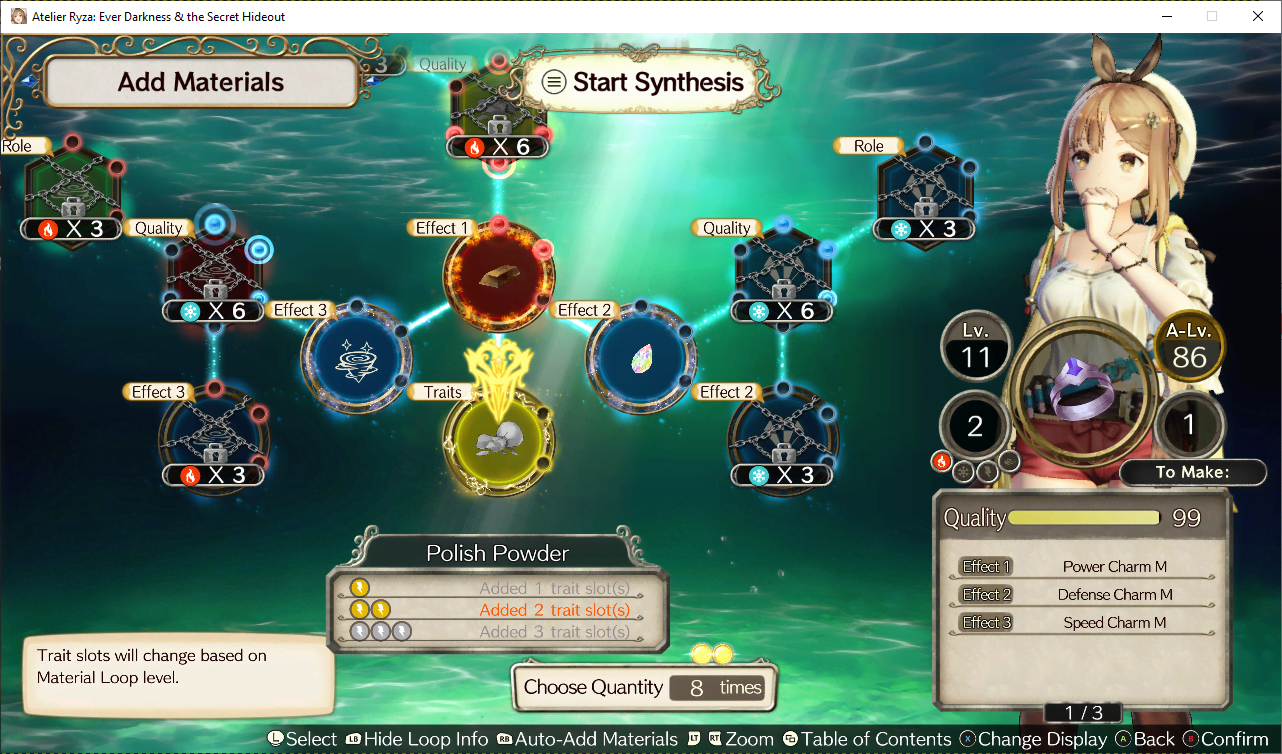
After…
Since it has a spread of 2, a single Arc en Ciel managed to fill element values for Material Loops two nodes away, such as this highlighted Polish Powder. It did not go to the Material Loops to the right because the unlock condition hasn’t been met. Now let’s add a second Arc en Ciel.
This time it managed to punch through and fill the locked requirements on several Material Loops. It also maxed out the Effect 3 and Traits nodes.
So, instead of putting a material in every single Material Loop, spread materials can move up to three nodes out and require fewer materials for the item overall.
You remember that stuff about shapes from forever ago? Spread will not work on Diamond shapes or on Recipe Morphs (Star shapes). It spreads through hexagons and circles only.
Equipment
Equipment is where the ability to recipe morph truly shines. Let’s start with a basic use case; Ryza’s third tier of weapon, made using Staltium. This is done from the perspective of an early game file (pre-first boss, even).
To make a good early game Grim Quartz, you start by making an Ingot. You max out its effects and set it aside. Second, you make a Bronze Eisen -- but you need to start at Ingot (at least, this early you need to; later on it doesn’t matter) and recipe morph to it. Just cut the shortest path possible in the Ingot, as the quantity of items you can add carries over between items. You should be capable of maxing out the Bronze Eisen’s effects this way. Finally, you repeat a similar process for Staltium -- start with Ingot, use the shortest path to Bronze Eisen, then the shortest path to Staltium, and proceed to max its effects.
You’ll actually need more Bronze Eisens and many more Staltiums for the optimal weapon, but I didn’t bother; this method is extremely ingot hungry and not particularly worthwhile before getting duplication.
You take these ingots to Ryza’s tier one weapon -- and you guessed it, you’re going to use the shortest path to the top tier. This is a bare minimum, raw stats staff. The idea is to use as few low level ingots as possible, and as many higher tier ones (Goldoterion later in the game) as possible.
For comparison’s sake, a very basic zero effort staff is on the left, and the one with the special ingots is on the right.
The process for making ultimate equips is largely the same, and you’ll have a duplicator for all the ingots you’ll need. You always stuff as few of the lower tier ingots as you can, and as many of the highest tier as you can. The reason is because the “Gear Synth” effects stack, which can add up to tons of stats. You might go for a couple roles depending on your needs, but generally you just use item rebuild to snag roles (and effects) on the highest tier weapon.
This works on accessories too, btw. Recipe Morph, stack ingots/cloths as much as possible, and finally item rebuild to make perfect at the final step.
Roles
You might be thinking ‘what about roles’, in the context of the above example. Roles do affect stats, but unless going specifically for Braver it isn’t worth always going for roles while recipe morphing; New Legend is perfectly worthwhile, for instance, as it benefits item tossers. Role level is determined between all your equipment, and the level caps at 10.
For those of you who don’t understand what roles are, I’m sure you’ve noticed that equipment will have Material Loops labeled with ‘Role’ sometimes. These will grant one level to Offense/Defense/Support roles, which are plainly visible in the equipment menu. As you hit certain level thresholds, you’ll gain bonuses, which are listed below.
| Name | ATK | DEF | SPD | Role Lv. | Extra |
|---|---|---|---|---|---|
| Novice | 100% | 100% | 100% | Low in everything | |
| Attacker | 105% | 100% | 100% | Low Offense | Increased crit rate. |
| High Attacker | 110% | 100% | 100% | High Offense | Increased crit rate, increased crit damage with ally in same row. |
| Excel Battler | 120% | 70% | 105% | Top Offense | Same as above, but can grant increased crit damage to entire row. If alone in row, speed increases. |
| Defender | 100% | 105% | 100% | Low Defense | With ally in same row: front row will be attacked more and may take damage for another character, back row will take reduced damage. |
| High Defender | 100% | 110% | 100% | High Defense | Same as defender |
| Mighty Lord | 105% | 120% | 70% | Top Defense | Same as defender, but if you are alone in your row, defense will increase |
| Supporter | 100% | 100% | 105% | Low Support | Chance to gain AP when using normal attacks |
| High Supporter | 100% | 100% | 110% | High Support | Same as supporter, plus if there is an ally in the same row, Quick Actions will cost less AP. If an ally isn’t nearby, you will not be attacked ‘unless specifically targeted’ thanks game |
| Aegis Warrior | 70% | 105% | 120% | Top Support | Same as high supporter |
| New Legend | 110% | 110% | 110% | High in everything, at least one 10 | Gain extra AP when using Core Items. If no ally is nearby, the effect of items will increase. |
| Braver | 130% | 130% | 130% | 10 in everything | Boosts power of Fatal Drive for allies within range. If there is an ally behind you, you’ll be targeted more. |
Equip Quality
Equip Quality is about +1 to ATK/DEF/SPD per point. You can expect 200 equipment quality with a full set of 999 items, at 50 per item. It just doesn’t appear this way straightforwardly because of roles.
Weapon Buff
Buffing allows you to put special extra effects on weapons. These extra effects are derived from the effects of the usable items you’ve chosen to use. We’ll take the humble Explosive Uni as an example. An Explosive Uni with either Burst or Scatter will give a weapon Surprise Smack… but if you upgrade that to Explosive, you’ll get Terror Crack. Not every effect has an associated forge effect; it’s probably only ‘Effect 1’ lines. This is basically a way to get three extra effects on your weapons, without much effort. You’ll also get stat boosts.
While buffing isn’t limited to usable items, other items only grant stat boosts (which you can get through forging instead -- which is repeatable to boot) and aren’t as exciting to talk about.
You can transfer traits through forging and buffing, but it’s recommended to use other methods to do this.
Throughout the game you’ll receive three Power Reactors. These are essential for buffing, as it allows you use three items. You can only buff once, so just duplicate your weapons first.
Last Updated: November 14, 2024